为什么我最终选择了WordPress
寻找写博客的CMS一段时间后,发现还是用WordPress来部署自己的Blog最合适。虽然市面上有各式各样的静态网站生成器、轻量级CMS,但WordPress凭借其强大的生态系统、灵活的定制性和成熟的社区支持,依然是个人Blog的不二之选。
我给自己定了个规矩:能自己动手写的功能,就尽量不用插件。这样不仅能精确控制网站性能,还能逼着自己多学点WordPress的开发知识,一举两得!
接下来我就把自己开发Blog时写的代码分享出来,希望能帮到也在折腾WordPress的你。
1. JPG/PNG自动转换WebP格式
为什么要搞图片优化?
先来看看WebP这个格式有多香:
- 无损压缩:比PNG小26%,画质一模一样
- 有损压缩:在同等质量下,比JPEG小25-34%
- 动图也行:支持动画,比GIF和APNG小得多
说白了,WebP就是现在网页图片的首选格式,能在保证画质的前提下,把图片体积压缩到最小。
图片太大到底有多烦?
你想想看:
- 打开一个网页,图片刷半天出不来
- 手机流量刷刷的掉
- Google一看你网站慢,直接把你排名往后挪
所以这个问题必须解决!
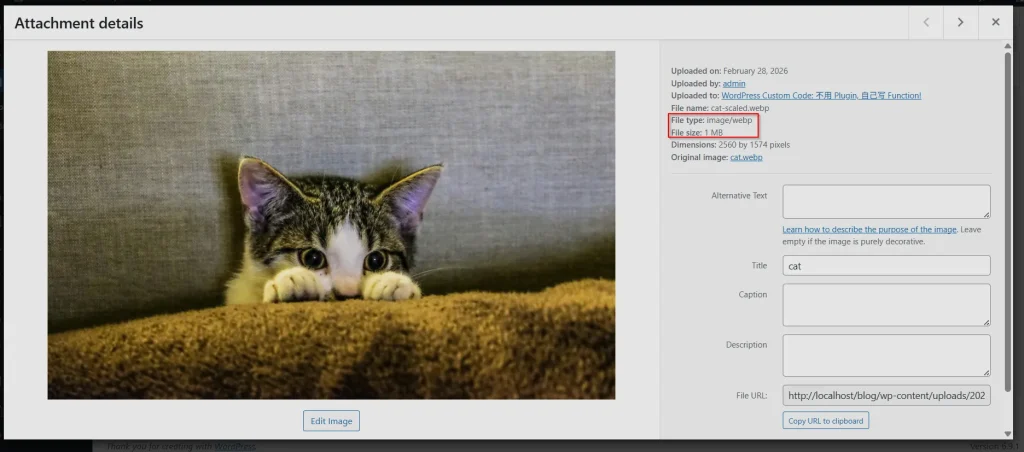
我的方法:自动转换+删掉原始文件
效果:
Original Image: JPG format, 2.62mb
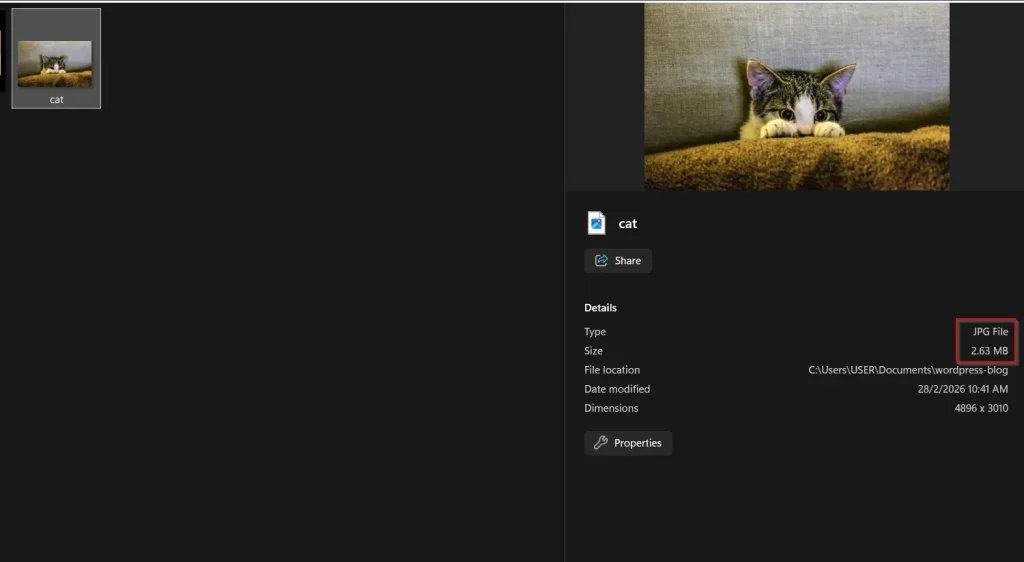
当Upload 完成后:Webp format, 1mb
方法:
- 把下面这段代码扔进
wp-content\themes\your-theme\functions.php文件里就行:
/**
 * Auto-convert uploaded images to WebP and DELETE originals
 */
// Hook into WordPress upload process
add_filter('wp_handle_upload', 'convert_to_webp_and_delete_original');

function convert_to_webp_and_delete_original($upload_data) {

    $file_path = $upload_data['file'];
    $file_type = $upload_data['type'];
    $supported_types = ['image/jpeg', 'image/png'];

    // Only process supported image types
    if (!in_array($file_type, $supported_types)) {
        return $upload_data;
    }

    // Check if GD or Imagick supports WebP
    if (!function_exists('imagewebp') && !class_exists('Imagick')) {
        // error_log('No WebP support detected');
        return $upload_data;
    }

    // Create image resource based on file type
    switch ($file_type) {
        case 'image/jpeg':
            $image = imagecreatefromjpeg($file_path);
            break;
        case 'image/png':
            $image = imagecreatefrompng($file_path);
            // Preserve transparency
            imagepalettetotruecolor($image);
            imagealphablending($image, true);
            imagesavealpha($image, true);
            break;
        default:
            return $upload_data;
    }

    if (!$image) {
        return $upload_data;
    }

    // Define WebP path (same name, different extension)
    $webp_path = preg_replace('/\.(jpe?g|png)$/i', '.webp', $file_path);

    // Convert to WebP (quality: 80)
    $success = imagewebp($image, $webp_path, 80);
    imagedestroy($image);

    if ($success) {
        // Delete the original JPG/PNG file
        unlink($file_path);

        // Update the upload data to point to the WebP file
        $upload_data['file'] = $webp_path;
        $upload_data['url'] = preg_replace('/\.(jpe?g|png)$/i', '.webp', $upload_data['url']);
        $upload_data['type'] = 'image/webp';
    }

    return $upload_data;
}

// Also need to update attachment metadata
add_filter('wp_generate_attachment_metadata', 'update_metadata_for_webp', 10, 2);

function update_metadata_for_webp($metadata, $attachment_id) {
    $attachment = get_post($attachment_id);
    $file_path = get_attached_file($attachment_id);

    // If this is a WebP file (original was deleted), make sure metadata reflects that
    if (pathinfo($file_path, PATHINFO_EXTENSION) === 'webp') {
        $metadata['mime_type'] = 'image/webp';

        // Update file reference in metadata
        if (isset($metadata['file'])) {
            $metadata['file'] = preg_replace('/\.(jpe?g|png)$/i', '.webp', $metadata['file']);
        }
    }

    return $metadata;
}
2. 图片点击放大功能
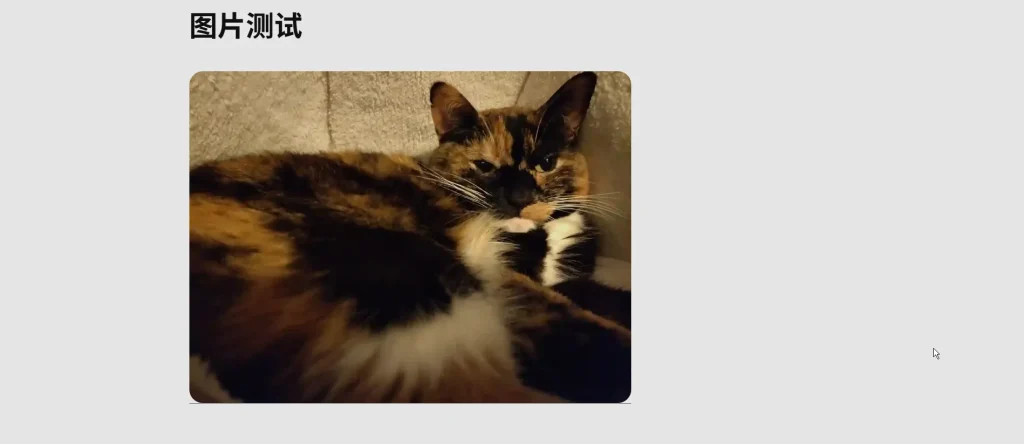
写blog难免会配上图片,然而default 的图片不能够被点击然后放大。
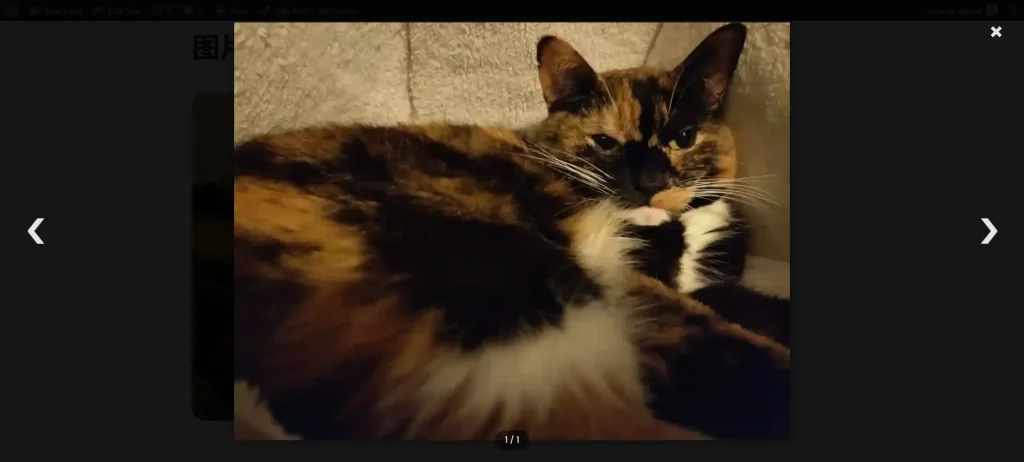
所以我写了一个功能, 当检测是图片的时候,点击出现lightbox, 然后图片就被放大了。
效果如下:
点击前:
点击后:
使用方法:
- 把以下code 放在
wp-content\themes\your-theme\inc\lightbox.php
<?php
add_filter('the_content', 'add_simple_lightbox');
function add_simple_lightbox($content) {
// Only run on single posts
if (!is_single()) {
return $content;
}
// Add lightbox class to all images
$content = preg_replace_callback(
'/<a href="([^"]+\.(jpg|jpeg|png|gif|webp))"[^>]*><img([^>]*)>/i',
function($matches) {
return '<a href="' . $matches[1] . '" class="simple-lightbox-trigger"><img' . $matches[3] . '></a>';
},
$content
);
// Add CSS and JS (only once)
static $lightbox_added = false;
if (!$lightbox_added) {
$lightbox_added = true;
$content .= '<style>
/* Lightbox CSS - copy all the CSS from previous code */
.simple-lightbox-modal {
display: none;
position: fixed;
top: 0;
left: 0;
width: 100%;
height: 100%;
background: rgba(0,0,0,0.9);
z-index: 999999;
cursor: pointer;
}
.simple-lightbox-modal.active {
display: flex;
align-items: center;
justify-content: center;
}
.simple-lightbox-modal img {
max-width: 90%;
max-height: 90%;
object-fit: contain;
box-shadow: 0 0 20px rgba(0,0,0,0.5);
}
.lightbox-close {
position: absolute;
top: 20px;
right: 30px;
color: white;
font-size: 40px;
font-weight: bold;
cursor: pointer;
z-index: 9999999;
}
.lightbox-close:hover {
color: #ccc;
}
.lightbox-prev, .lightbox-next {
position: absolute;
top: 50%;
transform: translateY(-50%);
color: white;
font-size: 50px;
font-weight: bold;
cursor: pointer;
padding: 20px;
z-index: 9999999;
user-select: none;
}
.lightbox-prev { left: 20px; }
.lightbox-next { right: 20px; }
.lightbox-prev:hover, .lightbox-next:hover {
color: #ccc;
}
.lightbox-counter {
position: absolute;
bottom: 20px;
left: 50%;
transform: translateX(-50%);
color: white;
font-size: 14px;
background: rgba(0,0,0,0.5);
padding: 5px 15px;
border-radius: 20px;
}
/* Image hover effect */
.simple-lightbox-trigger {
display: inline-block;
position: relative;
cursor: pointer;
}
.simple-lightbox-trigger:hover:after {
position: absolute;
top: 50%;
left: 50%;
transform: translate(-50%, -50%);
font-size: 30px;
background: rgba(0,0,0,0.5);
color: white;
padding: 10px;
border-radius: 50%;
pointer-events: none;
}
</style>';
$content .= '<script>
document.addEventListener("DOMContentLoaded", function() {
// Create lightbox elements
const modal = document.createElement("div");
modal.className = "simple-lightbox-modal";
modal.innerHTML = `
<span class="lightbox-close">×</span>
<span class="lightbox-prev">❮</span>
<span class="lightbox-next">❯</span>
<img src="" alt="Enlarged image">
<div class="lightbox-counter"></div>
`;
document.body.appendChild(modal);
const modalImg = modal.querySelector("img");
const closeBtn = modal.querySelector(".lightbox-close");
const prevBtn = modal.querySelector(".lightbox-prev");
const nextBtn = modal.querySelector(".lightbox-next");
const counter = modal.querySelector(".lightbox-counter");
// Get all images
const images = Array.from(document.querySelectorAll(".simple-lightbox-trigger"));
let currentIndex = 0;
// Open lightbox
images.forEach((img, index) => {
img.addEventListener("click", function(e) {
e.preventDefault();
currentIndex = index;
showImage(currentIndex);
modal.classList.add("active");
document.body.style.overflow = "hidden";
});
});
// Show image function
function showImage(index) {
const imgSrc = images[index].getAttribute("href");
modalImg.src = imgSrc;
counter.textContent = (index + 1) + " / " + images.length;
}
// Close lightbox
function closeLightbox() {
modal.classList.remove("active");
document.body.style.overflow = "";
}
closeBtn.addEventListener("click", closeLightbox);
modal.addEventListener("click", function(e) {
if (e.target === modal) {
closeLightbox();
}
});
// Keyboard navigation
document.addEventListener("keydown", function(e) {
if (!modal.classList.contains("active")) return;
if (e.key === "Escape") {
closeLightbox();
} else if (e.key === "ArrowLeft") {
e.preventDefault();
currentIndex = (currentIndex - 1 + images.length) % images.length;
showImage(currentIndex);
} else if (e.key === "ArrowRight") {
e.preventDefault();
currentIndex = (currentIndex + 1) % images.length;
showImage(currentIndex);
}
});
// Previous/Next buttons
prevBtn.addEventListener("click", function(e) {
e.stopPropagation();
currentIndex = (currentIndex - 1 + images.length) % images.length;
showImage(currentIndex);
});
nextBtn.addEventListener("click", function(e) {
e.stopPropagation();
currentIndex = (currentIndex + 1) % images.length;
showImage(currentIndex);
});
// Touch swipe for mobile
let touchStartX = 0;
let touchEndX = 0;
modal.addEventListener("touchstart", function(e) {
touchStartX = e.changedTouches[0].screenX;
}, false);
modal.addEventListener("touchend", function(e) {
touchEndX = e.changedTouches[0].screenX;
handleSwipe();
}, false);
function handleSwipe() {
if (touchEndX < touchStartX - 50) {
// Swipe left
currentIndex = (currentIndex + 1) % images.length;
showImage(currentIndex);
} else if (touchEndX > touchStartX + 50) {
// Swipe right
currentIndex = (currentIndex - 1 + images.length) % images.length;
showImage(currentIndex);
}
}
});
</script>';
}
return $content;
}
// Also make sure images are wrapped in links
add_filter('the_content', 'ensure_images_have_links', 5);
function ensure_images_have_links($content) {
// If image isn't wrapped in a link, wrap it
$content = preg_replace_callback(
'/<img([^>]*)src="([^"]+)"([^>]*)>/i',
function($matches) {
// Check if already in a link
if (preg_match('/<a[^>]*>.*' . preg_quote($matches[0], '/') . '.*<\/a>/i', $matches[0])) {
return $matches[0];
}
// Check if it's inside a link already
$full_context = $matches[0];
if (strpos($full_context, '</a>') !== false) {
return $matches[0];
}
// Wrap in link
return '<a href="' . $matches[2] . '" class="simple-lightbox-trigger">' . $matches[0] . '</a>';
},
$content
);
return $content;
}
?>- 然后在
wp-content\themes\your-theme\functions.php写下这段
// Add the image lightbox
require_once get_stylesheet_directory() . '/inc/lightbox.php';
3. Prettify Code
写技术博客嘛,肯定少不了贴代码。但你有没有发现,默认情况下WordPress显示代码真的很”朴素”——就是白底黑字,跟普通文本没啥两样。代码挤在一起,该有的颜色高亮全没有,看起来特别的累。
解决方案:Google Prettify
Google Prettify是一个lightweight library,不需要指定语言,它能自动识别。关键是体积小、速度快,完全满足我的需求。只是目前我还没调节好Copy and paste 的功能,或许将来我在优化这方面。
在这片blog 你看到的code 呈现方式都是Prettify 显示出来的
File Structure:
├── wp-content/
│   └── your-theme/
│       └── css/
|           └── prettify.css
│       └── js/
|           └── prettify.js
文件:
重点:
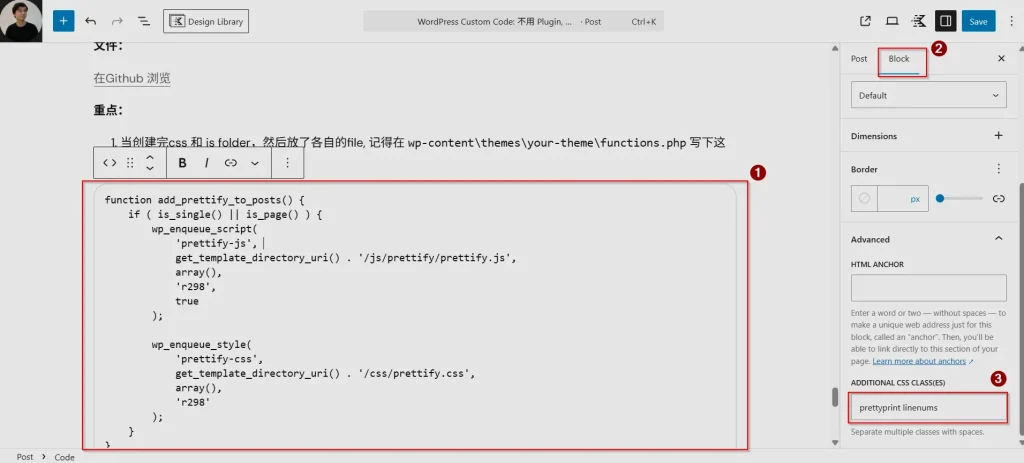
- 当创建完css 和 js folder,然后放了各自的css 和 js file, 记得在
wp-content\themes\your-theme\functions.php写下这段
function add_prettify_to_posts() {
    if ( is_single() || is_page() ) {
        wp_enqueue_script(
            'prettify-js',
            get_template_directory_uri() . '/js/prettify/prettify.js',
            array(),
            'r298',
            true
        );

        wp_enqueue_style(
            'prettify-css',
            get_template_directory_uri() . '/css/prettify.css',
            array(),
            'r298'
        );
    }
}
add_action( 'wp_enqueue_scripts', 'add_prettify_to_posts' );


function auto_add_prettyprint_to_pre($content) {
    if ( is_single() || is_page() ) {
        $content = preg_replace_callback(
            '/<pre(?![^>]*class=)([^>]*)>(.*?)<\/pre>/is',
            function($matches) {
                return '<pre class="prettyprint" ' . $matches[1] . '>' . $matches[2] . '</pre>';
            },
            $content
        );
    }
    return $content;
}
add_filter('the_content', 'auto_add_prettyprint_to_pre', 20);

function init_prettify() {
    if ( is_single() || is_page() ) {
        echo '<script>!function(){var e=document,t=e.createElement("script");t.src="https://cdn.jsdelivr.net/gh/google/code-prettify@master/loader/run_prettify.js",e.body.appendChild(t)}();</script>';
    }
}
add_action('wp_footer', 'init_prettify');
2. 然后在你编写blog 的时候,在code 的additional CSS 里加 “prettyprint linenums” 就可以了
Leave a Reply